
How to Create & Deploy EC2 Instance Using Terraform?
Learn how to create and deploy AWS EC2 instances using Terraform for efficient cloud infrastructure management.

Create & Deploy EC2 Instance Using Terraform
AWS EC2 (Elastic Compute Cloud) is a web service that provides secure, resizable compute capacity in the cloud. Terraform, on the other hand, is an open-source infrastructure as code (IaC) tool that allows you to define and provision infrastructure resources using a declarative configuration language. By combining these two powerful tools, you can easily automate the creation and management of your AWS resources. In this article, we will guide you through the process of creating and deploying an AWS EC2 instance using Terraform.
What is AWS EC2 & Terraform?
AWS EC2 is a core component of Amazon Web Services, allowing you to launch virtual servers in the cloud. It provides a wide range of instance types, operating systems, and storage options, giving you the flexibility to choose the resources that best suit your needs. On the other hand, Terraform enables you to define your infrastructure as code, making it easier to version control, collaborate, and automate the provisioning of resources.
Prerequisites:
Ensure that you have the necessary prerequisites before starting??
- An AWS account: Sign up for an AWS account if you don't have one already.
- IAM User with Administrative Access: Performing the required tasks for provisioning an EC2 instance will be made possible by this.
- AWS CLI: Install the AWS Command Line Interface (CLI) on your local machine.
- Terraform: Download and install Terraform on your local machine.
 Anurag Vishwakarma
Create & Deploy EC2 Instance Using Terraform
#1. Installing and Configuring Terraform
To install Terraform, follow these steps:
- Visit the official Terraform website and download the appropriate package for your operating system.
- Extract the downloaded package to a directory of your choice.
- Add the directory to your system's PATH environment variable.
Once Terraform is installed, configure it to interact with your AWS account:
- Open your integrated terminal in VS Code and run the following command
aws configure- Provide your AWS access key ID, secret access key, default region, and output format.
#2. Create a Terraform Configuration File
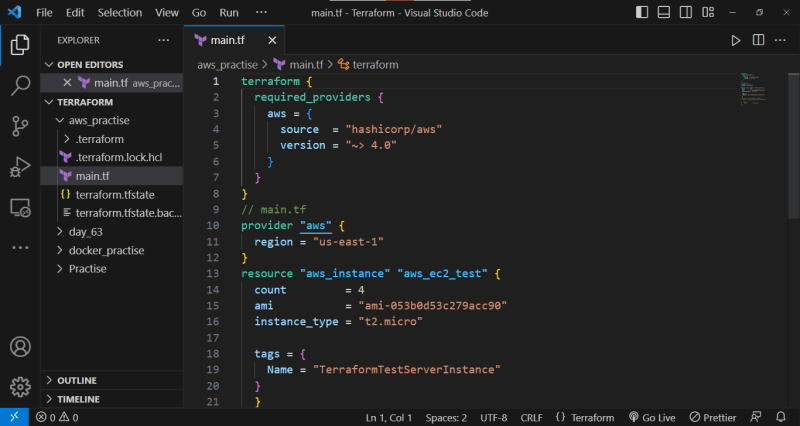
To create an EC2 instance using Terraform, you need to write a Terraform configuration file (with a .tf extension) that defines the desired state of your infrastructure.
Create a new file named main.tf in your project directory. This file will contain the Terraform configuration code.resource "aws_instance" "aws_ec2_test" {
count = 4
ami = "ami-053b0d53c279acc90"
instance_type = "t2.micro"
tags = {
Name = "TerraformTestServerInstance"
}
}
👉 Inside the main.tf file, add the following Terraform code to define the AWS EC2 instance resource.
#3. Initialize Terraform
Once you have the Terraform configuration file ready, follow these steps to initialize and apply the configuration:
- To start, access the terminal or command prompt and go to the folder that has your Terraform configuration file.
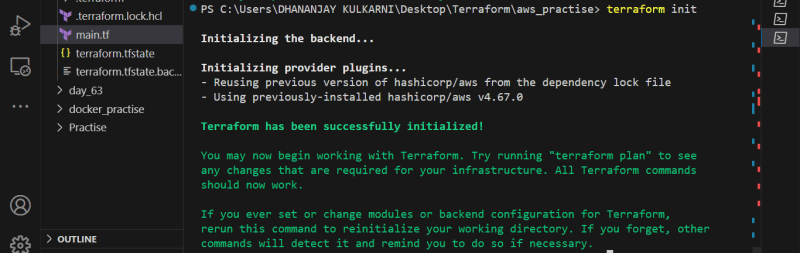
terraform init- Execute the command to initialize the directory and acquire the required provider plugins.
#4. Applying the Terraform Configuration
To create the EC2 instance based on the defined file configuration run the following command:
terraform apply
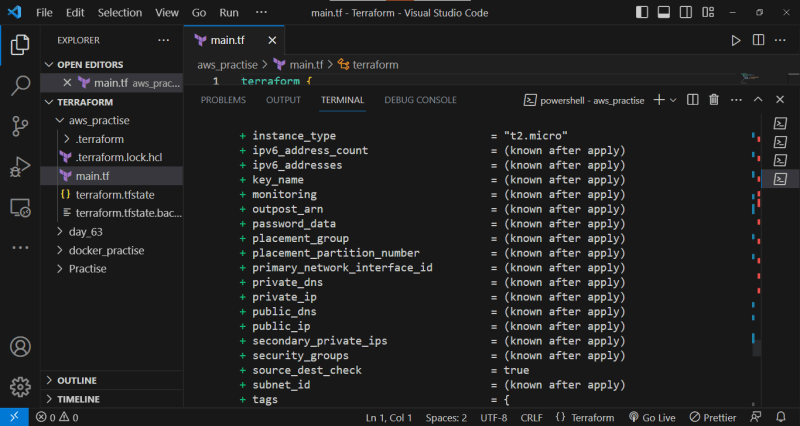


After displaying a summary of the changes it intends to make, Terraform will require confirmation by typing Yes. Upon confirmation, Terraform will proceed to provision the EC2 instance and provide output that includes the public IP address and other details.
Anurag Vishwakarma
#5. Verifying the EC2 Instance Deployment
To verify that the EC2 instance has been successfully deployed, follow these steps:
- Open the AWS Management Console and navigate to the EC2 service.
- Click on "Instances" in the sidebar.
- You should see the newly created instance listed with the name specified in the Terraform configuration file.

You can also verify the instance's availability by accessing it via SSH or RDP using the provided public IP address.
Anurag Vishwakarma
Managing the EC2 Instance
- It is crucial to tidy up the resources we allocated to prevent unnecessary expenses.
- Execute the below command in your integrated terminal.
terraform destroy
- Review the resources that are going to be deleted and type "yes" when asked to continue.

- Terraform will destroy the EC2 instances, ensuring a clean environment.
Anurag Vishwakarma
Conclusion
Creating and deploying an AWS EC2 instance using Terraform provides a scalable and efficient way to provision infrastructure resources in the cloud. By following the steps in this article, you can easily create & deploy AWS EC2 with Terraform to automate your infrastructure deployments and simplify resource management.
 Anurag Vishwakarma
 firstfinger
 firstfinger
 Anurag Vishwakarma
FAQs
Can I use Terraform to manage resources other than EC2 instances?
Yes, Terraform supports a wide range of AWS resources, including but not limited to EC2 instances. You can use Terraform to provision resources such as S3 buckets, RDS databases, and VPCs.
How can I update the Terraform configuration after making changes?
To update the Terraform configuration, simply modify the configuration file and run the terraform apply command again. Terraform will detect the changes and apply them to the existing infrastructure.
Can I use Terraform to provision resources in different AWS regions?
Yes, you can specify the desired AWS region in the Terraform configuration file. Terraform will create the resources in the specified region.
Is it possible to destroy the provisioned resources using Terraform?
Yes, Terraform allows you to destroy the resources provisioned using the terraform destroy command. Make sure to use this command with caution, as it will permanently delete the resources.
Are there any additional tools or services that can enhance the Terraform workflow?
Yes, there are several tools and services that can complement the Terraform workflow, such as AWS CloudFormation for managing infrastructure stacks, and HashiCorp Sentinel for policy enforcement.